AN AUSSIE 4 SPEED ADAPTER FOR A BENCH SEAT
by Alan Lindsay (Flamed_FE)
This is how I made my adapter to suit an Aussie 4 Speed gearbox in an FE without sacrificing the bench seat. The standard location of the shifter is too far back to fit without at least cutting a notch in the seat, or fitting buckets. However, with only a little effort in the shed, you can make a pair of adaptors to move the shifter forward and higher, and keep the standard bench seat intact.
It is based on this thread of Alex’s experiences and pictures. No measurements are meant to be taken as gospel. They are a guide to making templates which you may need to modify further. Remember I'm an accountant by trade, backyard engineering is just a hobby!
There are two steps to this project: making the adapters, and shortening the shifter linkages to work correctly in the shifter's new lcoation.
Step One: Adapter Plates
I suggest you do this in two stages: a paper stage and a metal stage. It is much easier to adjust or redo a paper template than a metal one ;-)
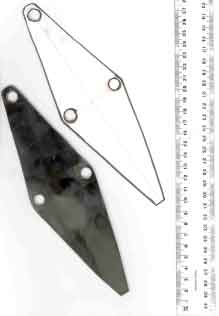
Follow the diagrams for the rear adapter:
|
Aussie 4-Speed Adaptor - Rear
|
|
 |
 |
|
Please note these diagrams are not to scale - I'm not that clever! - refer to scanned images for scaled templates
|
|
Draw and cut out this shape on a piece of stiff paper or thin card. (I paid 90 cents for a piece of A2 size thick paper from the local newsagent.) Being the fantastic engineer I am (NOT!) I laid my paper template on the gearbox, and using the ball of my thumb made an impression where the first bolt hole was. I then cut out the impression, placed the paper template back on the gear box, put a bolt in the cut out hole and repeated the process for the second bolt hole, replaced the template on the gear box and did the third bolt hole. This way I knew I had accurate placement of the bolt holes. You may at this stage want to also trim any excess off the sides or end.
Lay your paper template on a piece of steel (I used 2.5 mm thick) and trace. You can use some fridge magnets to hold the paper in place. Cut out the shape with either a jigsaw or angle grinder and drill out your holes. When drilling out the holes, remember to center punch the hole first (that stops the drill bit from wandering before it bites) and start small (3mm) and work your way up to the 10mm or 3/8 bit.
Ensure your adapter plate fits. Clean up with an angle grinder or bench grinder.
First one finished. Give yourself a quick break - go grab a drink, kiss your wife and tell her how much fun you are having. Try and ensure it is in the middle of a really important bit of All Saints*, that way you will be banished back out into the garage without any complaints!
You are going to follow the same process for the second adapter. Draw, cutout, mark the bolt holes and trim any excess from your paper template.
|
Aussie 4-Speed Adaptor - Front
|
 |
 |
|
Please note these diagrams are not to scale - I'm not that clever! - refer to scanned images for scaled templates
|
Trace, cut and drill from the paper template to the steel.
When marking where you are going to fold the top over, remember you need to allow enough space for some nuts to be welded to the underside. There is no exact height at which the fold should be done, but the closer to the gearbox's body the stronger it will be. You will need to score the metal (make a cut with the angle grinder approx half the thickness of the metal). It is preferable to make it straight, unlike my example. (After scanning the adapter I had to go back and re-score it correctly.) Place in vice and bend it over, or use a small sledge hammer to "persuade" it.
Use your paper template of the rear adapter to mark out the two bolt holes on the folded section of the front adapter. (Did you wonder why we made the back one first?) Ensure that the centre on the paper template is in line with the center raised section of the gear box.
If you now attach both adapters, you will notice a height difference between the two. You will need to make a pillar to attach to the front of the rear adapter to bolt the shifter into. You can either use a short section of tube with a nut welded into the top or use a section of bar and tap a thread into the middle. I used a section of bar 20mm diameter and approx 30mm high. The height will ultimately depend on where you have made your fold on the front adapter.
|
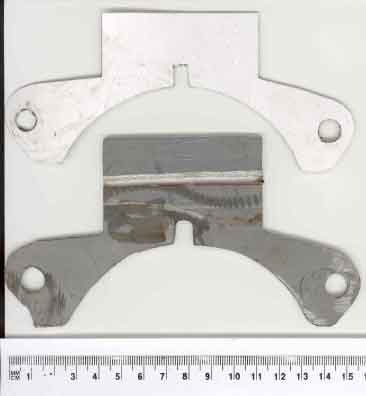
Bolt on your shifter and weld your pillar to the rear adapter, ensuring your shifter is sitting square. Also weld your fold on the front adapter for added strength and weld on the two nuts. Give the adapter plates a lick of paint and they are now complete. Time for another drink and to let the wife know you are still alive. The finished product should look something like the picture on the right. |
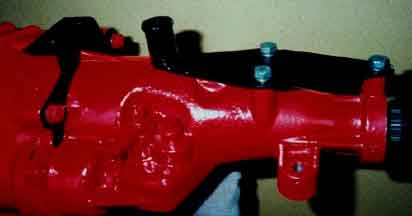 Completed adapter plates. |
Step 2: Linkages
To be continued....
* If such a thing exists.
Important Note: This document is intended as a guide for those persons interested in repairing or modifying their vehicle. The FE-FC Holden Car Clubs of Australia take no responsibility and accept no liability for the information contained herein. You must ensure that all work carried out and/or modifications made to your vehicle are legal in your state, and we recommend you contact an engineer or your local Traffic Authority for further information.
If you have a technical question about repairs or maintenance on your FE or FC, please post a question on our Discussion Forum.
Home || NSW || Queensland || SA || Victoria || Sign the Book || Chat about FE/FCs || Nationals || Tech Data